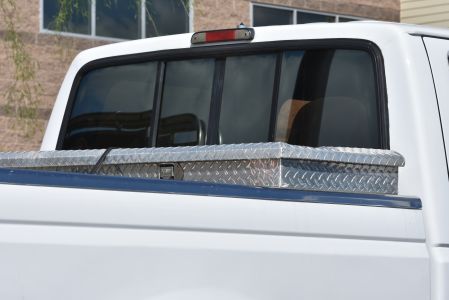
If you’ve ever seen or used top lid toolboxes, you know how functional they can be. They provide so much storage room for your items. Installed in the rear tray of your UTE, they only create excellent storage for your tools or other belongings that need safety during the transport, or ensuring they’re properly stored.
Connect with a verified mechanic in minutes. No appointments. No high fees. No waiting. Get back on the road and enjoy the ride.

Installing a top lid toolbox on your UTE can provide additional storage space and help you keep your tools and equipment organized. This item is essential for contractors or people spending a lot of time on the road.
If you want to know more about how to install a top lid toolbox on your vehicle, you’ve come to the right place. In this article, we’re creating a step-by-step guide to help you with the installation process. Keep reading and learn everything on how to do it.
Gather the necessary tools and materials
You will need a variety of tools to get the job done. First, you will need the actual top lid toolbox. You can purchase this item at some of the many shops providing vehicle accessories and upgrades. Find one that matches your requirements in terms of size, material, and features.
Then, you will need a mounting kit. Most toolboxes come with a mounting kit that includes brackets, bolts, washers, and nuts. Ensure that you have the appropriate mounting kit for your toolbox, such as a power drill, drill bits, screwdrivers, measuring tape, marker or pencil, level, socket set, and a ratchet.
Connect with a verified mechanic in minutes. No appointments. No high fees. No waiting. Get back on the road and enjoy the ride.
Choose the installation location
Think about where you want to install the toolbox on your UTE. Consider several factors, such as accessibility, convenience, and the impact on the vehicle’s balance. Most UTEs have a bed area at the rear, which is the perfect place for an item like this.

Review engine, brake issues, error codes and more with a Mechanic Online in just minutes.
Ask a Mechanic Live NowMeasure and mark the mounting points
Place the toolbox in the desired location and use a measuring tape to mark the mounting points on your UTE’s bed rails or sidewalls. Ensure that the marks are symmetrical and aligned correctly. If you miss just an inch, you’ll not be able to mount the box properly. This is one of the most important things even though many people fail to take it as seriously as possible.
Pre-drill holes
Using a power drill with an appropriate drill bit, pre-drill holes at the marked locations on the UTE’s bed rails or sidewalls. The hole size should match the diameter of the bolts provided with the mounting kit. Pre-drilling will make it easier to attach the toolbox later.
Install the mounting brackets
Attach the mounting brackets to the toolbox. The brackets should align with the pre-drilled holes in the UTE’s bed rails or sidewalls. Use the provided bolts, washers, and nuts to secure the brackets to the toolbox and the UTE. Tighten them securely using a socket set and ratchet.
Level the toolbox
Use a level to ensure that the toolbox is properly aligned and leveled. Make any necessary adjustments to the mounting brackets to achieve a balanced installation. Although during driving the items inside will surely not stay perfectly flat, it’s important not to cause a reason for concern in front. Additionally, an uneven box during installation will mean a higher chance for issues later.
Secure the toolbox
Once the toolbox is level, double-check that all bolts, washers, and nuts are tightened securely. This will ensure that the toolbox is firmly attached to your UTE. If some of them are not perfectly attached, it may cause your entire box to be loose and eventually cause serious problems while driving. Double check everything, as it is normal to miss some of the screws and think you screwed them, while they are only placed.
Test the installation
Give the toolbox a gentle shake and verify that it is stable and doesn’t move excessively. This will confirm that it is securely installed. It may sound silly, but this is the best way to ensure you’ve done a great job.
Weatherproofing and customization
If your toolbox didn’t come with weatherproofing features, you can add weather stripping or silicone sealant around the edges of the toolbox to prevent water or dust from entering. You can also customize the toolbox by adding additional accessories like locks, dividers, or foam inserts.
Conclusion
It is essential to consult the installation manual provided with your specific toolbox, as the installation process may vary slightly depending on the brand and model. Some boxes may be too complex, so it may be best to let professionals handle this for you.
Those who are sure that this is nothing special, and they can handle the job themselves, must follow the manual precisely. If they do, and handle the task perfectly, they’ll be able to use the top lid box for many years.

ced
Review engine, brake issues, error codes and more with a Mechanic Online in just minutes.
Ask a Mechanic Live Now